
Quick answer
The basic idea is simple. The practical questions appear when you start: Which color should come first? What if two codes look similar? Should you finish an entire color before moving on? And how do you find the little gaps that remain near the end?
This guide gives you a repeatable workflow for numbered mosaic pages. It focuses on reading the page, organizing your colors, and making steady progress. It does not claim to test particular pens, papers, or methods for covering printed numbers.
1. Know which kind of page you are coloring
Color-by-number pages do not all use the same structure. Some divide a picture into irregular outlined regions. Others build the picture from repeated cells, such as squares or hexagons. Both use a key, but the coloring experience differs.
Mosaci’s numbered mosaic pages use a grid of cells. The picture becomes clearer as you fill those cells. A small cluster that looks unimportant on its own may form an eye, an outline, or the edge between two objects.
That makes checking the printed code more useful than guessing from the subject. A cell near a brown acorn might belong to a dark outline rather than the acorn’s main color.
If the distinction is new to you, see what color by number means. For now, the important rule is straightforward: let the key guide each cell rather than assuming what color an object should be.
2. Keep the page, its key, and its reference together
Before coloring, find the key that belongs to your exact page. If a download includes a completed example, keep that nearby too. Each item has a different job:
| Item | What it helps you do |
|---|---|
| Numbered page | Find the cells you will color |
| Matching key | Identify the color assigned to each code |
| Completed reference | Understand the overall picture and check your progress |
Do not borrow a key from a similar-looking page. A different conversion of the same source image can assign different codes or use a different palette. We saw this in the two conversions made for this article: the same squirrel converted at two cell sizes produced keys whose code 1 was “Burnt orange” in one and “Orange red” in the other. That is one example, not a rule about every image or setting.
Mosaci’s free printables include a page to color, a matching key, and a finished example. Check the instructions accompanying your chosen download, especially if it uses marks rather than numbered colors.
For a new custom conversion, keep its outputs together in one folder. If you regenerate the picture with different settings, separate the versions so their keys cannot become mixed.
3. Read the codes before choosing your colors
Treat every printed code as a label, not as an instruction to count or calculate. Depending on the page, the labels may include numbers, letters, or symbols. Their meaning comes from the accompanying key.
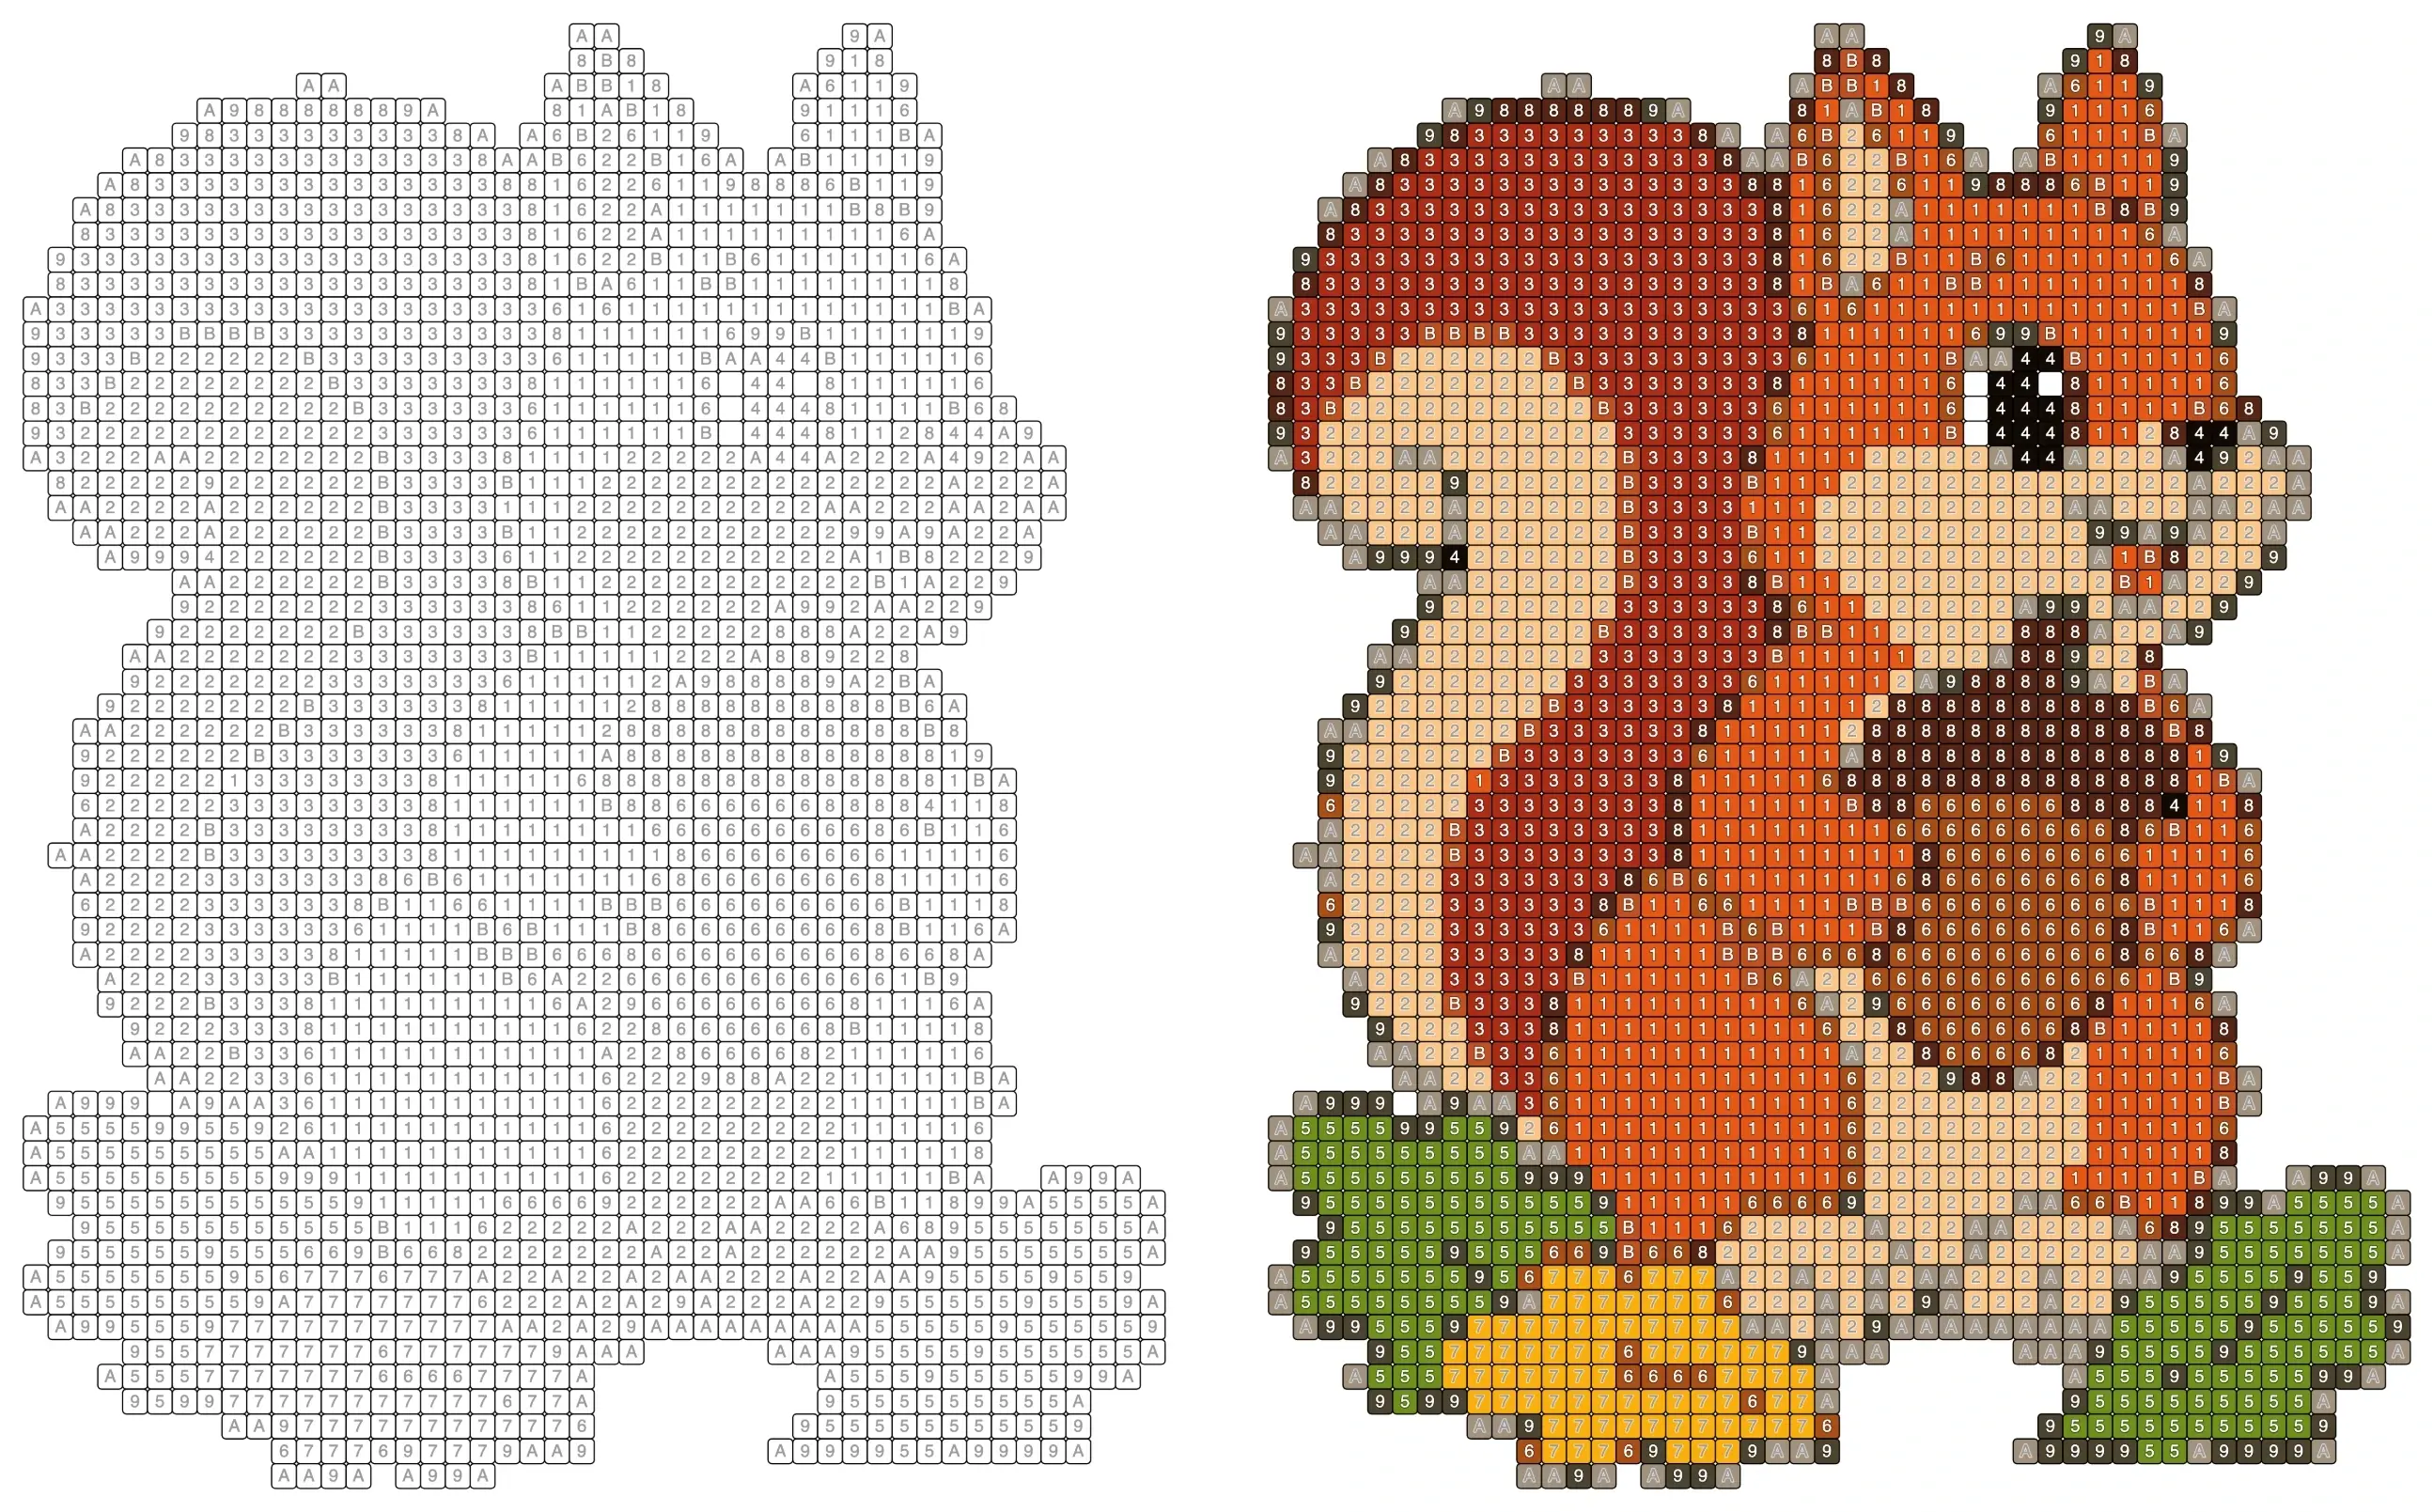
Look carefully at characters that could be confused at a small size. The example page in this guide uses both 8 and B, and they sit next to each other around the acorn (see the close-up below). On a page like that, compare the two in the key before filling a large group of cells.
On paper, bring the key closer rather than guessing at a tiny label. On screen, enlarge the page until you can distinguish the characters comfortably.
Do not automatically interpret an uncolored-looking cell as white. Check whether it carries a code and what that code means. Equally, follow the page’s instructions for areas intentionally left blank. Background treatment can differ between designs.
4. Make a small color reference of your own
If you are coloring on paper, draw a small sample of each chosen color on a separate scrap and write its page code beside it. Keep that sheet with the key.
This does not need to become a large exercise. Its purpose is to stop you repeatedly asking, “Which brown was I using for this code?” It is especially helpful when several pencils or pens have similar-looking barrels.
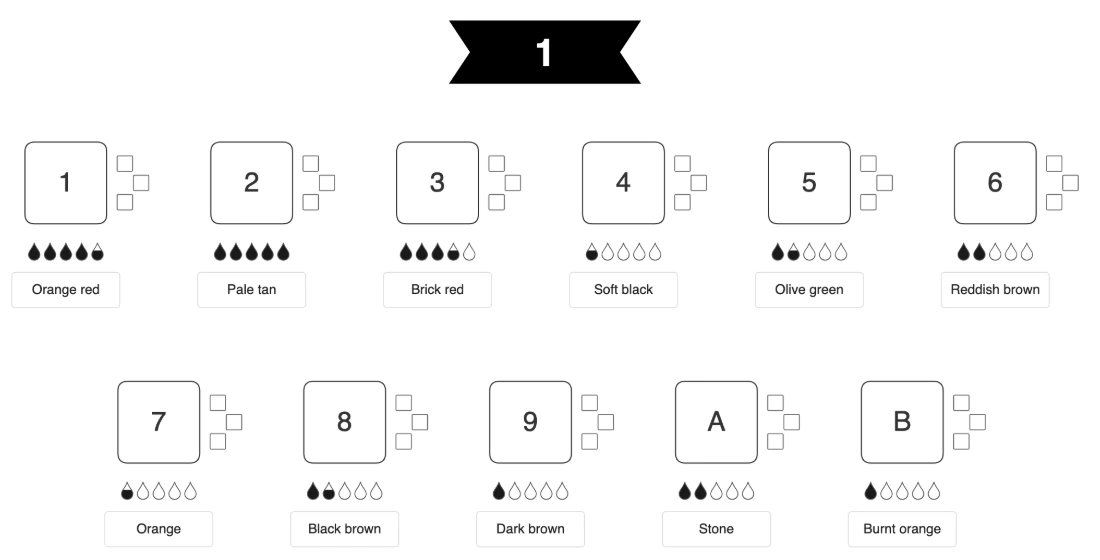
You can follow the supplied colors approximately if your set does not contain an exact match. Choose a consistent replacement for each code and note the substitution. On the example page, for instance, three codes are browns — Reddish brown (6), Black brown (8) and Dark brown (9) — so whichever pencils you choose for them need to stay distinguishable from each other.
5. Choose a small starting area
You do not need to decide how to finish the entire picture before beginning. Choose one manageable patch where the labels are clear and the cell boundaries are easy to follow.
There are two useful ways to organize the work:
| Approach | How to use it | Main trade-off |
|---|---|---|
| One code across the page | Find and fill every visible occurrence of a chosen code | Fewer color changes, but more searching |
| One section at a time | Work through the codes within a small area, then move on | Easier to track a local area, but more color changes |
Neither approach is compulsory. A combination often makes sense: pick one code, finish its cells within a small section, and then decide whether to continue elsewhere.
Avoid calling a code “finished” just because you have completed one patch. There may be isolated cells with the same label on the other side of the picture.
6. Use the squirrel example as a reading exercise
The example in this guide starts from a squirrel holding an acorn beside three oak leaves. It is an original AI-generated illustration made for this article — not a photograph, and not itself a Mosaci page.

We converted it with Mosaci’s color-by-number generator: Square cells, 8.5 × 11 in portrait page, the largest cell size the generator offers, and the default color count. The converter produced 11 codes, 1 to 9 and then A and B. The page images below are screenshots of the generator’s on-screen preview, not the 300 DPI file you download.
Start with one clear patch: the acorn. Its cap is a solid block of 8 cells, and the key lists 8 as Black brown. Below the cap, the body of the acorn is mostly 6, Reddish brown. Fill a few 8 cells first, then a few 6 cells.
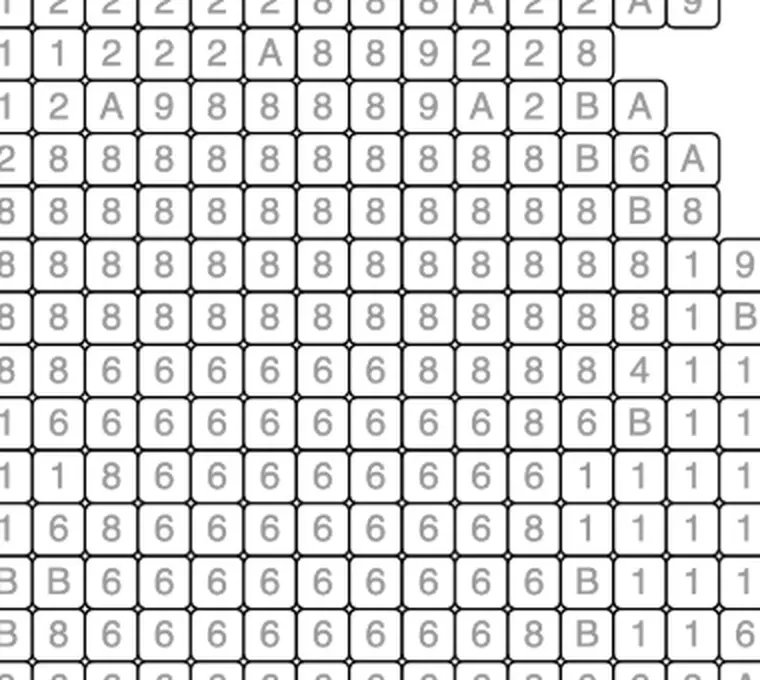
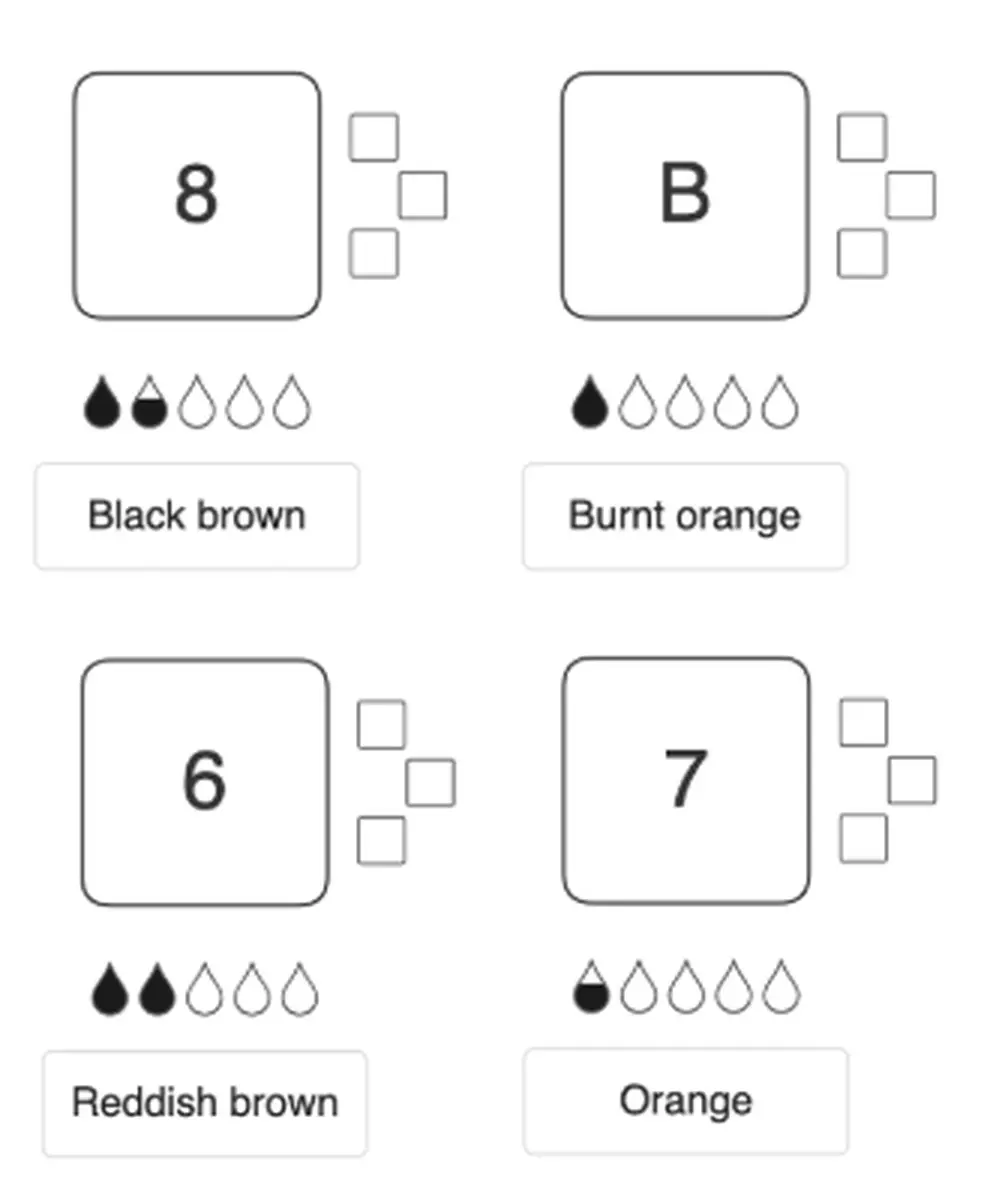
Open the full color key · Open the full-size close-up
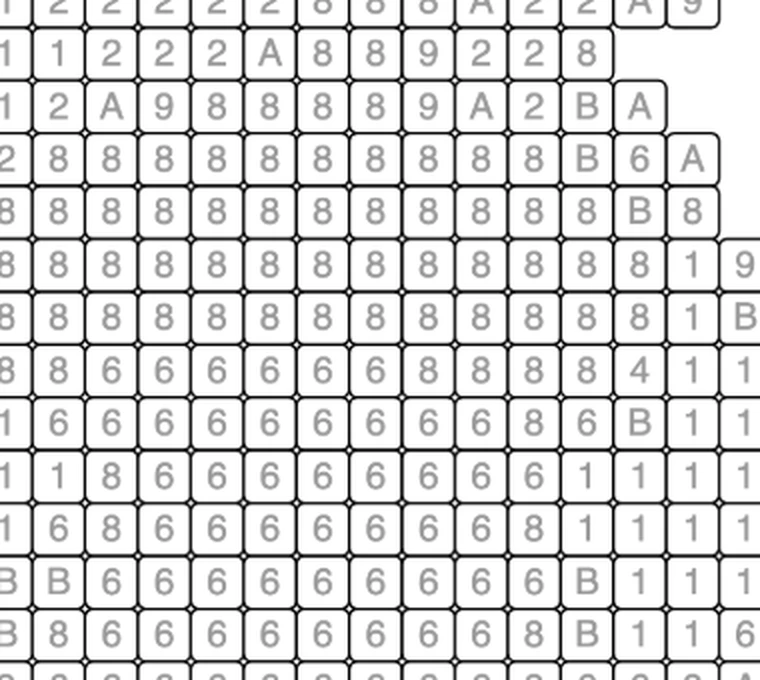
Notice the B cells at the right edge of the cap. They are Burnt orange, not Black brown — the same 8/B pair from section 3, in a place where a misreading would put a dark cell into the squirrel’s fur.
Next, compare that patch with the completed reference. Look for the relationship between neighboring colors: the dark cap against the reddish body, and the orange fur around them. Do not assume that the converted grid preserves every curve of the original drawing. Its cells approximate the source at the selected settings.
The key can also surprise you. The oak leaf that looks yellow in the source carries code 7, and the name the key gives for code 7 is “Orange”. On screen the filled cells still look yellow; the name is simply the key’s label for that color. The code is what tells you which cells belong together. This is why reading the label matters more than guessing from the picture.
This exercise helps separate two tasks: reading the code correctly and recognizing the developing picture. If the picture is not obvious yet, you can still make accurate progress by following the labels.
7. Check a few cells before filling a large group
After the first few cells, pause. Confirm that you selected the intended code and assigned the intended color. A quick check here can prevent repeating the same mistake across a large part of the page.
Watch the boundaries between neighboring cells. On a dense mosaic, it is easy to move one cell sideways while searching a row. Return your attention to the printed label whenever the boundary becomes unclear.
If you notice a mistake on paper, record it before continuing. Whether it can be corrected depends on the materials and the mark already made; this guide does not promise an erasing or covering method.
You can also choose to keep an accidental color as part of your version. The key provides a target, but a personal coloring page does not need to become an exact reconstruction to be enjoyable.
8. Record progress when you stop
Before putting a paper page away, leave yourself a short note. Record the code you were using and the area where you stopped, such as “lower-left leaf, checking remaining cells.”
If you maintain a checklist beside the key, distinguish between “started,” “finished in this section,” and “checked across the page.” That avoids treating a partly completed color as completely done.
Keep your color samples with the page. A note about the current code is less useful if you cannot remember which pencil you assigned to it.
You do not need a percentage or a timed session. A clear stopping point is enough. On your next visit, read the note, compare the key, and check one previously colored cell before continuing.
For especially dense pages, smaller sections can make that return easier. See the guide to mystery mosaic grid size if choosing the page itself is part of the difficulty.
9. Find missed cells systematically
Near the end, random scanning becomes less useful. Instead, inspect the picture in a consistent direction: left to right across a horizontal band, then down to the next band.
Use the key to identify any remaining labeled cells. Check the edges of large color areas, narrow outlines, and isolated details. A small missed cell can be hard to notice when surrounded by completed ones. On the example page, the outline of the squirrel is made of scattered 9 and A cells, which are exactly the kind that get missed.
Compare the overall picture with the reference, but do not use the reference as a substitute for reading a remaining code. The reference helps you locate a suspicious patch; the label tells you which color belongs there.
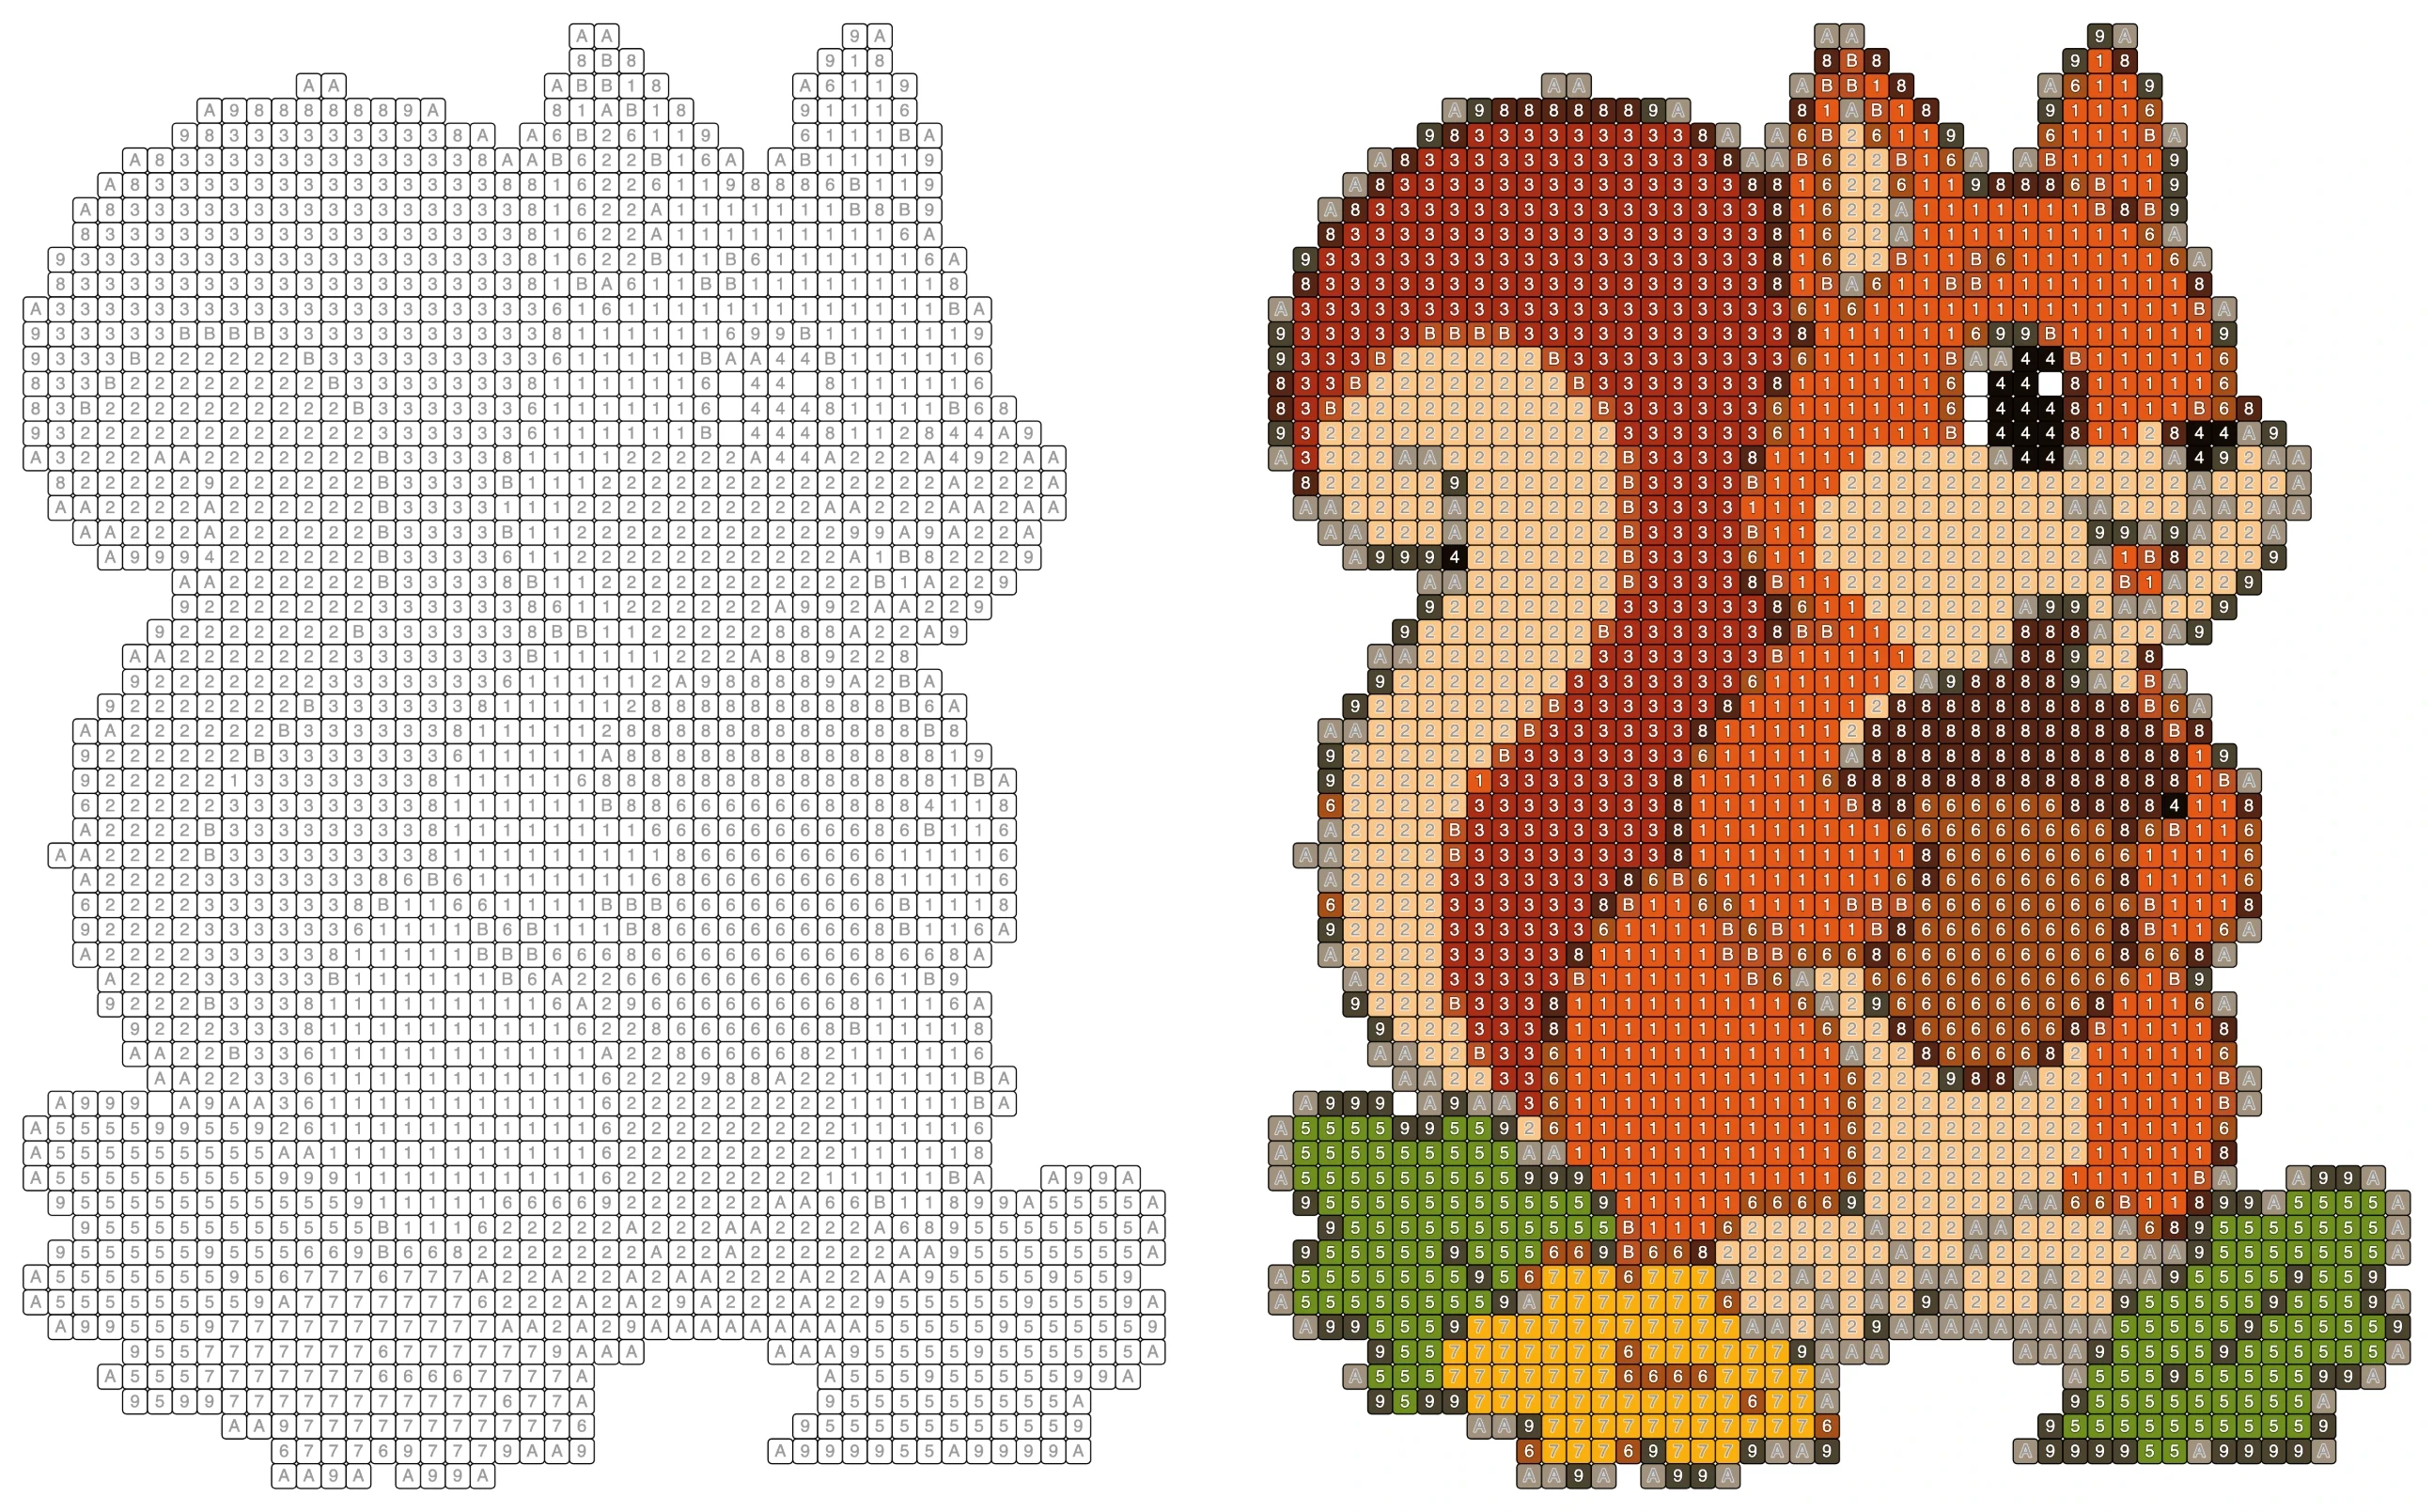
If you chose substitute colors, expect the result to differ from the reference. Check consistent code-to-color choices rather than demanding identical hues.
10. Prefer coloring on screen? Use the same basic workflow
You can also color by number online in Mosaci. Open a free page, select a palette color, and tap or drag over cells marked with its number. Enlarge the board when the cells are difficult to read.
The same reading habits apply: check the selected code, work through a manageable patch, and inspect missed cells. You do not need to transfer the printed key onto paper when the palette is available beside the board.
Free-page progress is stored in the browser you use. Continue in that browser if you want to return to the same local progress; do not assume opening another device will bring it across.
Paper and screen are alternative ways to follow a numbered page. Choose the one that suits the session you want. Creating a new page is a separate step, available through the color-by-number generator when you want to use your own image.
Frequently asked questions
Do I have to use the exact colors shown in the key?
Should I finish one number before moving to another?
Should I color light or dark areas first?
What if a printed number still shows through?
Where can I get a page to try?
Related tools
Written by
Mosaci Studio TeamThe team behind Mosaci Studio
Mosaci Studio is built to help KDP publishers, Etsy sellers, and hobby artists turn photos into print-ready coloring pages without any design experience.
Published Nov 20, 2026